First off, I won’t use old puns saying Dave the Diver “cast a line and reeled me in.” Instead, I’ll say Mintrocket’s game is surprisingly clever.
Let’s quickly sum up the game: You play as Dave, a diver who starts a sushi restaurant with Cobra and Bancho. You fish for ingredients during the day and help Bancho at night. The restaurant is set at the Blue Hole.

The game combines roguelike exploration and time management. It also has lots of mini games and complex systems. The story is silly but ambitious and engaging.
While the game is well-balanced, it can sometimes be confusing. The many systems and mechanics might cause confusion or blindspots.
And that is precisely why I’ve put together this list of invaluable tips for mastering Dave the Diver! If you’re thinking of giving it a try (you definitely should — it’s one of the best games of 2023) you should read this first.
1. Collect Plenty of Materials
Besides catching fish, you can also collect different kinds of resources during your daily dives. These include scrap metal, rope, starfish, sea grapes, minerals, and ingredients found in cooking pots.
In the beginning of the game, catching new fish is a natural focus. You really need the fish to boost sales during restaurant evenings. But, don’t forget to look for other resources while exploring. Scrap metal and other objects are used for upgrading weapons later in the game.
Ingredients found in cooking pots help you enhance your dishes. This can yield much more cash as a result.
I recommend spending some of your hard-earned money on upgrading your cargo box early on. The cargo box determines how much you can carry on each dive. Having a larger cargo box means you can collect more stuff.
2. Don’t Neglect Certain Guns
Starting out, you’ll find guns through weapon crates during your dives, giving you access to a variety of melee, guns, and even different harpoon tips that can be used to deal with fish (especially the big and scary ones) instead of only relying on your standard harpoon.
All weapons found in weapon crates disappear as soon as you leave the water. After completing the prologue sub mission Weaponsmith Duff, you’re able to gather materials to give to Duff to craft a permanent version of the basic underwater rifle. As you progress in the game, different types of weapons will become available.
One of my biggest mistakes after unlocking this functionality was to solely focus on the damage-dealing weapons, mainly the sniper rifle and triple axel. They are great when facing scary monster-like fish. But they have a major drawback.
You see, when collecting fish either by using the harpoon or by killing them with murderous weapons, you don’t get the highest quality of that fish — and therefore less meat. The only way to catch 3-star fish is to capture them alive. And for that, you need a hush dart and a net gun.
Tranquilizers sedate fish (obviously) while net guns trap them. With some creatures, such as the bluespotted stargazers, the only way to catch a 3-star one is to capture it with a net gun. Since the upgrades require more and more resources, you should start crafting and upgrading those two weapons as early as possible.
Note that you can modify other weapons into tranquilizers, such as the basic underwater rifle, the triple axel, and the sniper rifle, but they all do damage as well as potentially sedating the target.
3. Disassemble Guns When Diving
With the start of the Chapter 2 main mission, you can disassemble guns and harpoon tips found in the water into fragments. Fragments are required to upgrade your permanent weapons.
These fragments can be found scattered throughout the different maps of the game, but you shouldn’t rely on solely gathering this — it’s tedious as hell, because later upgrades require a lot of them. Instead, you should make it a habit of disassembling weapons found in weapon crates. Found a weapon you don’t need? Disassemble it. Found a weapon you do need? Take it and disassemble the old one.
4. Equip Charms
Throughout the game, you can gain or unlock certain charms. These charms basically work as buffs. Some of them are incredibly handy, especially later in the game.
One such charm is the Eco Gemstone Bracelet, which increases the amount of minerals acquired by mining certain stones. Another is the Eco Waterproof Bag, which increases weight limit by 30 kg.
You can equip two charms at a time. Whenever you acquire a new one, make sure to equip it and experiment with different combinations.
5. Use Auto Supply
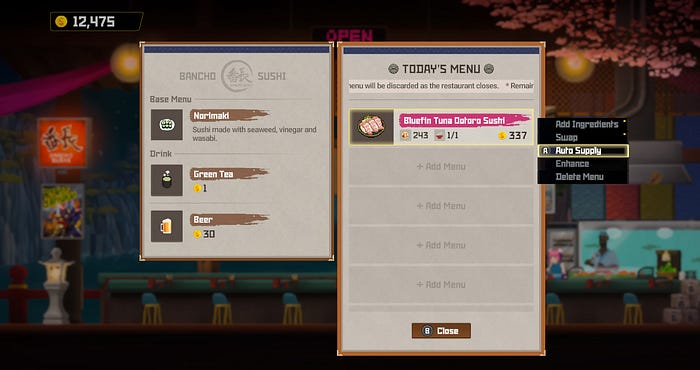
The “restaurant simulator” part of the game is fairly straightforward, yet intense. You have quite a lot of different things on your plate: setting the menu, serving customers, grinding wasabi, cleaning tables, making sure you don’t run out of food… and much of it isn’t properly explained in the brief tutorial.
On top of that, Bancho is a hard-boiled, no-nonsense chef. He does not reuse food. Which means that any unsold dishes will be discarded — including all of the ingredients used to create them.
When adding dishes to your menu, you have to specify the amount of servings. There’s also a feature called Auto Supply. By enabling this feature, the dish will be resupplied automatically as long as you have enough ingredients in stock.
So instead of adding 20 servings of a certain dish with the risk of having to trash ten of them (and waste valuable resources), you can add a single serving to your menu and let Auto Supply do the work. If you end up selling 12 of that particular dish, Auto Supply will make sure that only 12 are made. No waste.
This is especially valuable in the beginning of your adventure, when you’re still learning the ins and outs of the game and the cognitive load is relatively high. In later parts of the game, you might want to manually set the menu to maximize your income, since some of the more complicated dishes yield more servings. For example, a maxed out Tropical Fish Sushi dish will yield nine servings, which means that you will supply nine servings every time Auto Supply kicks in.
6. Hire Sushi Staff to Dispatch
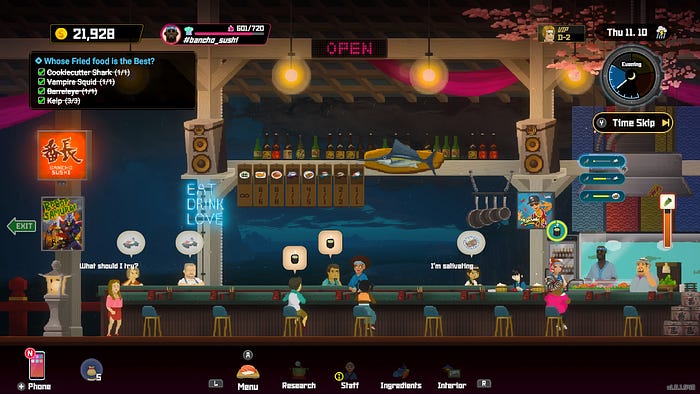
There are a total of 22 different characters that can be hired to work in the sushi restaurant, with one being brought on automatically and another through a sub mission, while the rest must be hired manually through ads after finishing the Chapter 1 sub mission A Scolding from Yoshie.
Staff has stats in four different categories:
- Cooking: Determines how fast the staff prepares a dish ordered by a customer.
- Serving: Determines the staff’s speed and the amount of time it takes to perform advanced serving tasks when assigned to the dining area.
- Procure: Determines the maximum amount of resources obtained from dispatching staff to gather ingredients.
- Appeal: Determines the amount and frequency of tips received from serving in the dining area.
The staff you’ve hired that isn’t assigned to either the kitchen or the dining area will be placed in the waiting room. From here, they can be dispatched to fetch certain ingredients otherwise only found in cooking pots while diving.
You should therefore hire more staff than fits in the kitchen and dining area and regularly dispatch them on fetch quests. This way, you won’t run out of important ingredients.
7. Always Enhance Dishes

Most of the dishes in the game starts at a level 1 ranking and can be enhanced. Enhancing a dish means they will be more expensive (racking up more gold as a result) and have better taste rating. While the process itself requires an increasing amount of resources, enhancing a dish is permanent — so you’ll be able to reap the benefits of enhanced flavor and price without sacrificing more ingredients when you put the dish on your menu.
Enhance a dish whenever you have the opportunity, especially dishes with a high base price. It will really pay off in the long run. Who wouldn’t want to earn 25–30K gold per evening thanks to a few maxed out dishes?
8. Invest in Otto’s Farm and the Fish Farm
The fish farm is unlocked by completing the sub mission A Noisy Customer in Chapter 2 and Otto’s farm is built to source fresh rice for the VIP Mission Michael Bang’s Inspiration.
The fish farm is separated into nine different sections for each biome found while diving. You can also buy upgrades to expand tanks and hold more fish. Catching fish with 2 or 3 stars sometimes results in fish eggs and roe being sent to the fish farm. When you have two of the same fish in a tank, they breed and spawn more of their kind — and you can send them as ingredients to the restaurant. This means that you won’t always have to spend time farming certain creatures.
Otto’s farm consists of a rice paddy, a vegetable garden, and a chicken coop. You buy, plant, water, and harvest any crops in the vegetable garden, weed the rise paddy, and fertilize both fields as needed. It’s a worthwile endeavour, given how many ingredients some of the more complex dishes require.
SPOILER ALERT BONUS: Maximize Your Bei Wallet With the Shark Teeth Mini Game
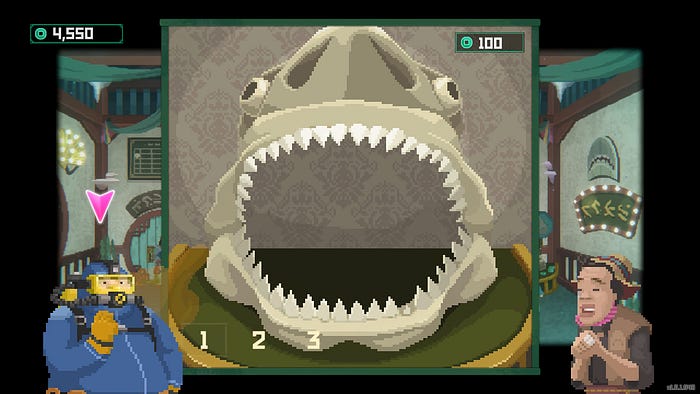
After unlocking the Sea People Village in the finale of Chapter 2: Into the Deep, you can travel to the village twice a day using the magic mirror (it doesn’t work in the evening). Besides being able to grow seaweeds in Gumo’s farm and buy dumplings with different buffs in Mima’s restaurant, you can also play mini games in the game parlor.
One of the mini games is called Shark Teeth and is run by Junak. Before the game, you’re asked to bet 10, 50, or 100 bei (the currency used by the Sea People). When the game begins, the shark jaw opens and will briefly display a trick tooth, also called the shark cavity. You and Junak alternate pressing down on the teeth along the jaw, and can choose to press one, two, or three teeth at a time. Whoever presses on the trick tooth first makes the shark jaw clamp down on their hand, losing the game.
This is based on an old game that actually has a mathematical solution: make sure your opponent starts a turn on a multiple of 4 (such as 16, 12, 8, or 4) and always choose the number that would reduce the number to a multiple of 4.
This is how you do it in practice:
Once it is your turn, count how many teeth are remaining from the start to the trick tooth (do not include the cavity tooth in this number). If it is not a multiple of 4 (4, 8, 12, 16), choose the number of teeth that would reduce the number to a multiple of 4. If there are 13 teeth between you and the fake tooth, you would select 1 to drop it to 12. If there are 18, you would choose 2 to reduce it to 16.
Once your opponent starts their turn on a multiple of 4, all you have to do is keep them on multiples of 4 to be guaranteed to win. To do this, keep the turn sums equal to 4.
- If the opponent chooses 1, you choose 3.
- If the opponent chooses 2, you choose 2.
- If the opponent chooses 3, you choose 1.

To summarize, whoever starts their turn with a multiple of 4 is guaranteed to lose if their opponent plays correctly. And luckily for you, Junak never plays correctly. If you start your turn on a multiple of 4, just stick with choosing 1 and wait for Junak to mess up.